|
|
This document describes PuTTY settings preferred by the the instructor of the Introduction to Unix/Linux course.
There are numerous additional settings not discussed here that are also useful, but these will provide a good basis for later expansion.
This is the main configuration panel that appears when the PuTTY executable is executed. After making the settings shown in the following sections, come back here and fill in the IP address and a name to save the settings under, then click the Save button. Now the settings can be recalled quickly (and the connection opened) by double-clicking on the name in the list of saved settings.

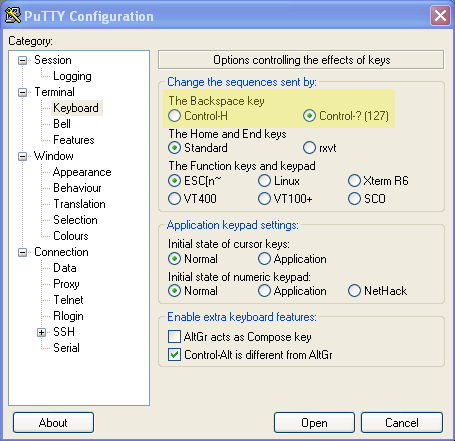
The only setting likely to need changing on this panel is the Backspace configuration, and this setting only needs to be changed if the Backspace key currently doesn't work properly.
The typical issue is that PuTTY is configured to send a particular code when the Backspace key is used, but the computer on the other end expects a different code. Until they are synchronized, the Backspace key won't work.
While the remote Unix system can be configured to accept whatever PuTTY
is sending (via the stty command) that would require changing every
remote server. It's generally much simpler to change PuTTY instead.
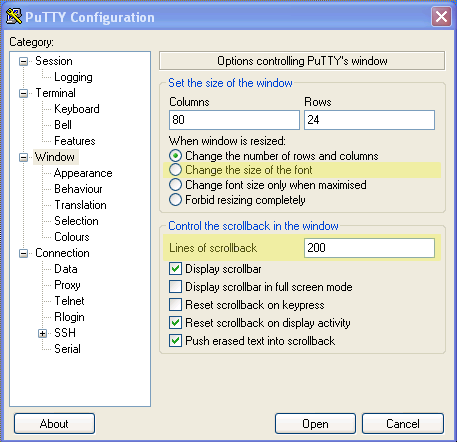
In the top-level panel for Window are two settings that are convenient to change: how to handle changes to the window size, and how many lines of scrollback to provide.
The default option for the first setting says that resizing the window should keep the font size constant and change the number of rows and columns. The author prefers that the number of rows and columns remain constant and the font size should change!
The second setting defaults to "200" (at the time of this writing) and can be changed to a larger amount, if desired. It is best not to make it too large, since a larger scrollback area requires more memory to track. (And Windows has never been accused of being "memory efficient"!) The author typically adds a zero to the end, making the number "2000".
This panel allows the font to be selected. The default is the monospace Courier New but the author finds this choice to be less than ideal. Even if the translation is set correctly (see below) this font doesn't include glyphs in character positions that are commonly used by the Linux man pages, thus causing the "unknown character" glyph to be used instead (a hollow square).
The author prefers the Consolas font at a 14-point size. It provides very noticeable differences between zero and "oh", and the one and "ell" are similarly distinguishable.

The remote system might be using a character encoding other than what PuTTY expects. If this is the case, characters will appear in the PuTTY window as garbled text or as unusually accented text (the umlaut over the lowercase "a" seems to be pretty common!).
The solution is to determine which translation the remote system is
using and then configure PuTTY to use the same one. Running the
locale command on Linux will show the character encoding.
This panel in the PuTTY configuration will allow it to be changed to
the same value. (Most Linux systems use UTF-8 so choosing that in the
dropdown list on this panel is the appropriate selection.)
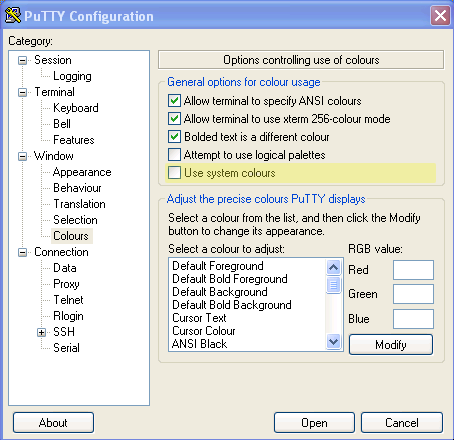
The last change is in regards to the default color selection. PuTTY normally uses white text (actually about a 75% gray) on a black background. Using this panel the individual colors can be changed, and while it can be quite rewarding to choose "the perfect color palette" for your personal preferences, it's also a tedious process.
The author recommends simply selecting the Use system colors checkbox. This will produce a "reverse video" effect, giving you black text on a white background.